Plot all borders 
 Program name : ALLPLOT.LSP,
setallplot, aplot.lsp, mkbdr.lsp, plotbdr.lsp
Our goal
1. If we draw several drawings in one file, the program should be able to recognize the location of the border and print it.
2. The Program should be able to open and close multiple files by themselves, find the borders in them, and recognize the scale and print them.
First suggestion!Using the ALLPLOT Command
Create a program with LISP. ALLPLOT.LSPÀÇ ±â´ÉÀº
- finds the border. Use the (ssget) function to find the border whose block name starts with 'border'
- Plot the found borders in order.
- If there are multiple borders, the plt file names are numbered sequentially after dwg name.
-
1. Printer Setting : Set the printer for allplot, paper size, style and offset.
-
 Example


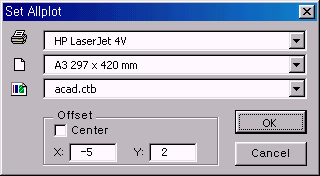
you can select SETALLPLOT icon in [DJDG]UTITITY of POPUP menu or SETALLPLOT button in utility toolbar, the following dialog appears.

Define the printer type, paper size, plotstyle name and offset in order from the top and press the ok button to terminate SETALLPLOT
The program will write the above information to a file called allplot.set in the djdg room. Open allplot.set and it should look like this:
---- Allplot.set ----
HP LaserJet 4V
A3 297 x 420 mm
acad.ctb
-5,2
Now you are ready to use allplot.
-
2. Using Allplot : Finds the border in a file and prints them to a printer or to a file.
-
Command: allplot
- Write the plot to a file? ile/< P >lotter: f

- [Choose whether to output to file or plotter. If you select P, the settings made in setallplot is applied. That is, the printer, paper size, style, and offset in the allplot.set file in the djdg room are applied]
- Plot Millimeters=Drawing Units or Fit or ? it/< S >cale/: a3

- [Set print scale.
F Scale to Fit,
S Scale of border is applied. That is, it is used to output to A1.
A3 Print drawing That drawed as A1 to A3 size, That is, program appliy exactly twice the scale of border, if border scale is 1: 100 then Allplot apply 1: 200 scale. Therefore, unlike Scale to Fit, the scale of the printed drawing is accurate..]
- C:\Program Files\ACAD2000\Drawing1 is Plotted
¡ß When applied to one file
To print all borders in the current DWG file
command: ALLPLOT 
F F F ¡ç What you have to do is just these all ¡ç What you have to do is just these all
|
¡ß When applied to multiple files
For example, if you want to print multiple borders in multiple DWG files,
for example
you have files TEST1.DWG and TEST2.DWG in the current directory, TEST1.DWG has two borders, and TEST2.DWG has three borders.
We are now going to make all the borders in the two files into plt files. Let's look at the working sequence using the ALLPLOT function
¨ç First, create a script file using notepad.
Let's call the script kkk.scr. (The extension of the script file is SCR.)
open "d:\geo\dwg\d01.dwg" allplot f a3 qsave close
open "d:\geo\dwg\d02.dwg" allplot f a3 qsave close
open "d:\geo\dwg\d03.dwg" allplot f a3 qsave close
|
The reason for adding qsave close to the script file is that if the printer information applied when allplot is different from the information saved in the existing file, a message window appears asking if you want to save the file when closing the file. To prevent this window from popping up, do a qsave and close the file.
¨è Run AutoCAD.
command: script [a dialog box pops up and select kkk.scr]
Let's look at step by step what the computer does when you run the command above.
¡æ opened the script file..
fist line is 'open test1'. run it as it
(actually It is same to do open command, command: open test1 test1 Ä£°Í°ú °°´Ù)
¡æ script read the following commands, and command ALLPLOT ( ALLPLOT command Find all borders in the test1.dwg file and plot them)
¡æ You're done with one file. Test1.plt and test11.plt are created in the current directory.
¡æ After completing the ALLPLOT command, read the following script command.
The next Script command is 'open test2 allplot'. Perform the plot in the same way as before. Test2.plt, test21.plt, and test22.plt are now created.
¡æ Completed all missions safely.
Now let's get off work. I just need to go to work next morning and check it out?
How can you List DWG Files in Current Directory |
dir *.dwg /b > ppp.scr
aves the list of * .dwg files in the current directory to a file named ppp.scr..
dir *.dwg /f > ppp.scr (must use 4DOS only.)
Saves a list of full pathnames of * .dwg files in the current directory to a file named ppp.scr (required for long files on Windows 95) |
|
Second Suggestions!Using APLOT.LSP!
Most of the above functions are functions to find and plot all border in DWG file.
But there are cases like this. There are 10 angles in the DWG file, but you only want to output 3 of them.
In this case, using ALLPLOT or PLOTA1 would be a waste.
In this situation, you can use a program called APLOT.LSP.
in COMMAND: status, type APLOT , then you are asked to select borders.
After selecting the desired borders and finishing with  ,
you are asked to name them in turn.
Give them names in order, PLT FILE will be made.
Third Suggestions!Automatic printing of different size borders
In the case of a regular drawing, you can insert a border or externally refer to it with xref, so you can use programs such as allplot or aplot which are auto plot programs. However, you cannot use such a program unless it is a formal drawing such as a structural calculation illustration. Two programs, MKBDR.LSP and PLOTBDR.LSP, makes borders and print automatically borders that have not equal size. The previous MKBDR.LSP is a program that creates borders, and the later PLOTBDR.LSP is a program that finds and plots these borders.
¡ØNotice
-
When you create a border with mkbdr.lsp, the border's name starts with 'BDR$', such as BDR$1, BDR$2, BDR$3 .., and so on. If you keep creating a border, 'BDR$' is created by adding 1 to the last number of borders created last.
-If you need several same borders, it's better to make one and copy that rather than continue using the mkbdr command. Because it takes up a lot of memory.
- You can plot all borders or selected borders with PLOTBDR command.

 Example
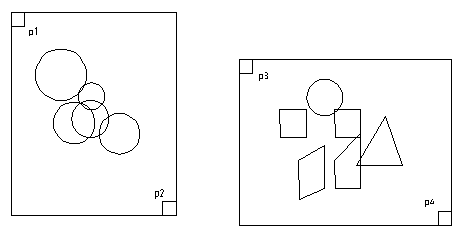
Create border with MKBDR.LSP
Pick point: {p1} [Pick first point of plot window]
Pick Second point: {p2} [Pick second point of plot window] ¡æ blocks called BDR$1 are made at that positions
Pick point: {p3} [Pick first point of plot window]
Pick Second point: {p4} [Pick second point of plot window] ¡æ blocks called BDR$2 are made at that positions
 Example
Auto plotting borders made with MKBDR(plot all borders)
All/<Select>: a ¡æ Enter 'a' to plot all borders whose names begin with BDR$)
 Example
Auto plotting borders made with MKBDR(plot selected borders)
All/<Select>: s
Select object: {Select borders that you want to plot}
Select object:  [Finish selecting] ¡æ Selected borders will be plotted.

![]() Program name : ALLPLOT.LSP,
setallplot, aplot.lsp, mkbdr.lsp, plotbdr.lsp
Program name : ALLPLOT.LSP,
setallplot, aplot.lsp, mkbdr.lsp, plotbdr.lsp  Example


 F
F ¡ç What you have to do is just these all
  [a dialog box pops up and select kkk.scr]
  test1
test1 Ä£°Í°ú °°´Ù)
 , then you are asked to select borders.
  ,
you are asked to name them in turn.
Give them names in order, PLT FILE will be made.
 Example
Create border with MKBDR.LSP
 Example
Auto plotting borders made with MKBDR(plot all borders)
 ![]() ¡æ Enter 'a' to plot all borders whose names begin with BDR$)
¡æ Enter 'a' to plot all borders whose names begin with BDR$)
 Example
Auto plotting borders made with MKBDR(plot selected borders)
 ![]()
 [Finish selecting] ¡æ Selected borders will be plotted.